RN UI 연습 - 3 ButtonGroup 만들기
이번에 만들어야 하는 부분은
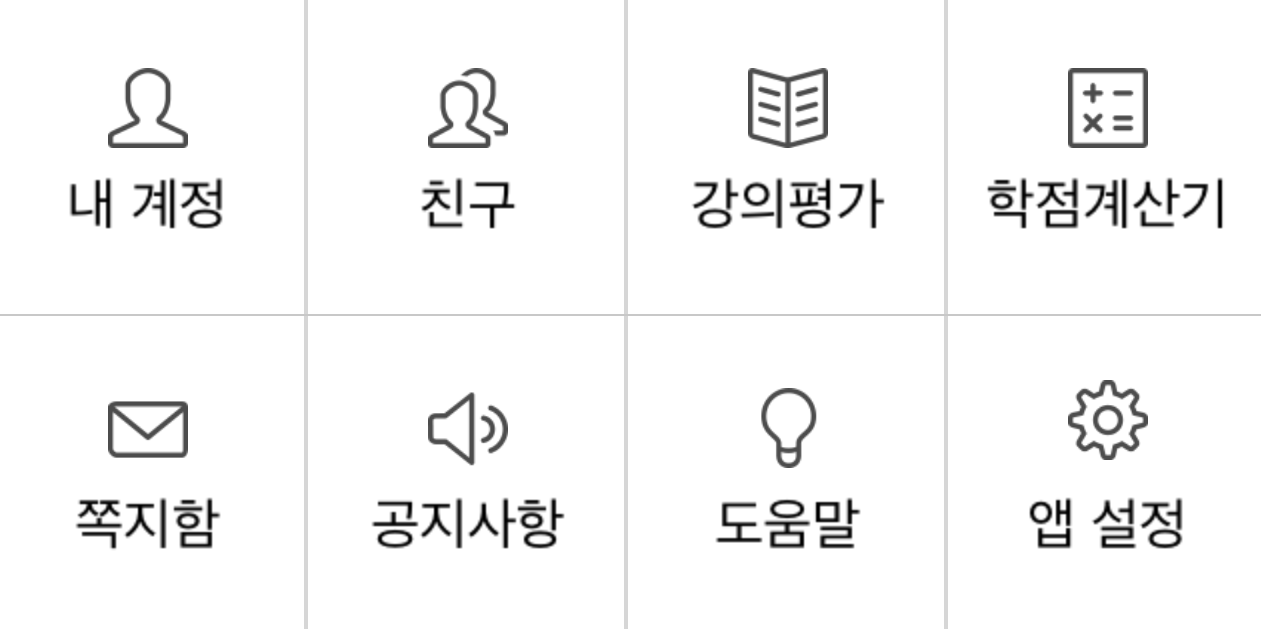 이 부분 입니다.
이번에는 똑같은 버튼이 8개 있군요. 제 생각에는 위 4개, 아래 4개가 같은 View안에 있고 그 View안에 버튼들이 가로로 늘어져 있는것 같습니다.
바로 코드로 들어가 볼까요?
render() {
    return(
      <View style={styles.buttonGroup}>
        <View style={{flex: 1, flexDirection: 'row'}}></View>
        <View style={{flex: 1, flexDirection: 'row'}}></View>
      </View>
    )
  }
이렇게 되겠군요.
    <View style={styles.buttonGroup}>
        <View style={{flex: 1, flexDirection: 'row'}}>
          <View style={{flex: 1, height: 100, borderWidth: 0.5}}></View>
          <View style={{flex: 1, height: 100, borderWidth: 0.5}}></View>
          <View style={{flex: 1, height: 100, borderWidth: 0.5}}></View>
          <View style={{flex: 1, height: 100, borderWidth: 0.5}}></View>
        </View>
      </View>
이렇게 하고 실행하면 크기에 알맞게 View들이 나뉘어져 있습니다.
이 버튼 1개를 일단 Button 이라는 클래스로 만듭니다.
class Button extends Component {
  render() {
    return (
      <View style={{flex: 1, height: 100, borderWidth: 0.5, justifyContent: 'center', alignItems: 'center'}}>
        <View style={{width: 50, height: 50, backgroundColor: 'gray'}} />
        <Text>내 계정</Text>
      </View>
    )
  }
}

export default class buttonGroup extends Component {
  render() {
    return(
      <View style={styles.buttonGroup}>
        <View style={{flex: 1, flexDirection: 'row'}}>
          <Button />
          <Button />
          <Button />
          <Button />
        </View>
        <View style={{flex: 1, flexDirection: 'row'}}>
          <Button />
          <Button />
          <Button />
          <Button />
        </View>
      </View>
    )
  }
}
을 실행하면 적당히 알맞은 틀이 나오는 군요. 근데 전부다 내 계정 이라는 이름을 가지고 있습니다. 이걸 바꿀려면 어떻게 해야 할까요? 이름 마다 클래스를 만드는건 매우 비효율적 으로 보입니다.
여기서 RN은 this.props 라는 것을 지원합니다. 이걸 통해서 우리는 개체 속성을 가지고 올 수 있는데요, 잘 모르시겟죠? 다음 코드를 보시면 쉽게 이해를 하실 겁니다.
class Button extends Component {
  render() {
    return (
      <View style={{flex: 1, height: 100, borderWidth: 0.5, justifyContent: 'center', alignItems: 'center'}}>
        <View style={{width: 50, height: 50, backgroundColor: 'gray'}} />
        <Text>{this.props.name}</Text>
      </View>
    )
  }
}

export default class buttonGroup extends Component {
  render() {
    return(
      <View style={styles.buttonGroup}>
        <View style={{flex: 1, flexDirection: 'row'}}>
          <Button name="내 계정" />
          <Button name="친구" />
          <Button name="강의평가" />
          <Button name="학점계산기" />
        </View>
        <View style={{flex: 1, flexDirection: 'row'}}>
          <Button name="쪽지함" />
          <Button name="공지사항" />
          <Button name="도움말" />
          <Button name="설정" />
        </View>
      </View>
    )
  }
}
이걸 실행하면 이름이 알맞게 바뀌어 있습니다.
Button은 name이라는 속성을 받습니다. 이 속성안에 이름이 들어있지요.
그 다음엔 간단히 Button 클래스에서 this.props.name을 통해서 이 속성값을 가져 올 수 있습니다.
물론 이건 js코드이기 때문에 괄호( { } ) 안에 있죠. 이로써 간단하게 우리는 js 코드를 가져 올 수 있었습니다.
이번에는 image는 나중으로 하고 그냥 gray로 처리하죠.