RN UI 연습 - 2 NavBar, User 만들기
가장 간단해 보이는 NavBar을 만들어 볼까요?
 뭐 없습니다. 그냥 backgroundColor 을 바꾸어 주시고, Text을 넣고 중앙정렬 해주시면 됩니다.
비슷한 예제를 한적이 있습니다. 혼자서 해보시길 바랍니다.꼭!
class NavBar extends Component {
  render() {
    return(
      <View style={styles.navBar}>
        <Text style={styles.navBarText}>
          더 보기
        </Text>
      </View>
    )

  }
}
//style 부분을
  navBar: {
    height: 60,
    backgroundColor: '#FF6E40',
    justifyContent: 'center',
    alignItems: 'center',
  },
  navBarText: {
    fontSize: 20,
    color: 'white',
  }
이렇게 해주시면 됩니다.
이제 user부분을 만들어 볼까요?
 부분은 몇개로 나누어 질수 있을까요? 어떻게 하면 지금까지 햇던 연습으로 이걸 만들수 있을까요?
제 생각에는
 이렇게 나눌수 있을것 같군요
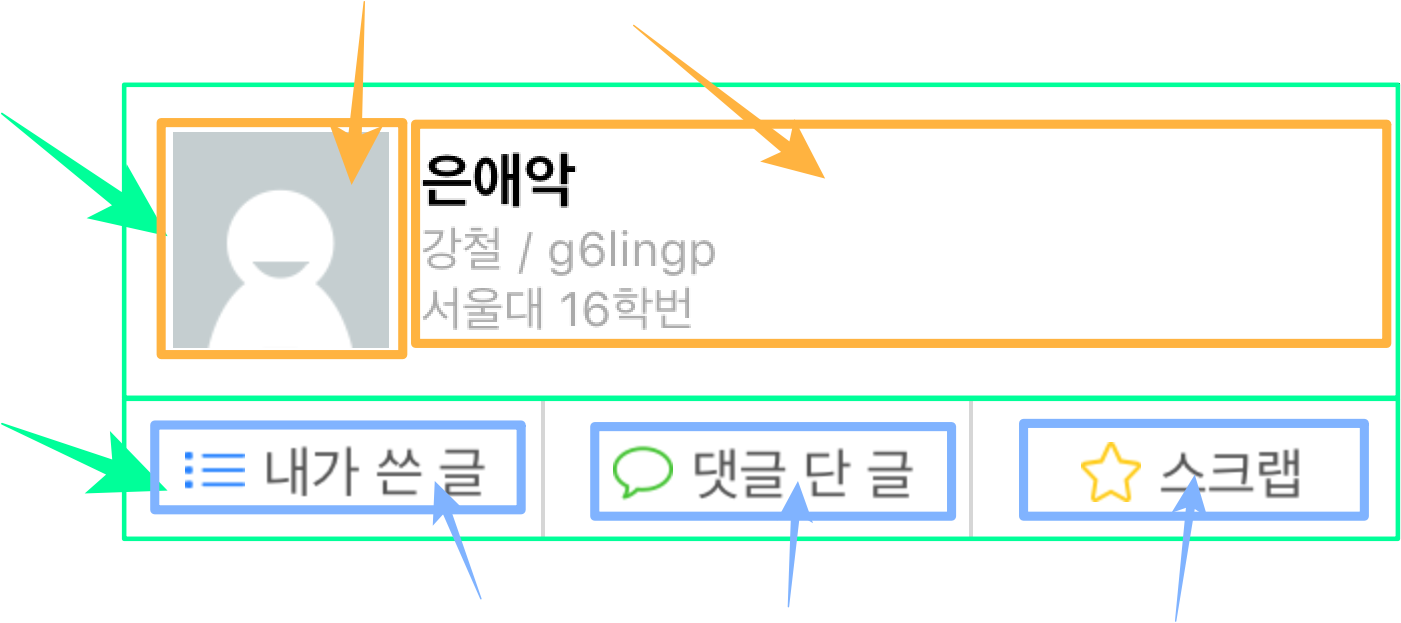
일단 2개의 민트색박스(세로정렬) 로 나눕니다. 그다음 위의 View는 다시 2개의 주황색박스로 나눕니다.(가로정렬). 주황색박스의 왼쪽부분은 이미지. 오른쪽부분은 3개의 Text가 있군요. 3개의 Text는 세로 정렬 로 되었네요. 그다음 밑의 민트색박스를 봅니다. 밑의 민트색 박스는 3개의 파란색 박스가 있군요 (가로정렬) 파란색 박스 안에는 다시 이미지 1개와 텍스트가 있구요.
이렇게 나눌수 있을것 같군요
일단 2개의 민트색박스(세로정렬) 로 나눕니다. 그다음 위의 View는 다시 2개의 주황색박스로 나눕니다.(가로정렬). 주황색박스의 왼쪽부분은 이미지. 오른쪽부분은 3개의 Text가 있군요. 3개의 Text는 세로 정렬 로 되었네요. 그다음 밑의 민트색박스를 봅니다. 밑의 민트색 박스는 3개의 파란색 박스가 있군요 (가로정렬) 파란색 박스 안에는 다시 이미지 1개와 텍스트가 있구요.
아마 이런식으로 나누면 될 것 같습니다.
그러면 1개씩 해보도록 합시다.
<View style={styles.user}>
        <View style={{height: 150}}>
        </View>
        <View style={{height: 50}}>
        </View>
</View>
이렇게 나누면 민트색 박스로 나눈것 이지요. 그다음 주황색 박스, 파란색 박스를 만들어 봅시다.
<View style={styles.user}>
        <View style={{height: 150, flexDirection: 'row'}}>
          <View style={{width: 100}}>
          </View>
          <View style={{flex: 1}}>
          </View>
        </View>
        <View style={{height: 50, flexDirection: 'row'}}>
          <View style={{flex: 1}}></View>
          <View style={{flex: 1}}></View>
          <View style={{flex: 1}}></View>
        </View>
</View>
위에 부터 보면 일단 flexDirection을 row 해줍니다. 가로정렬을 해야 하기 때문이죠. 그리고 첫 View는 width을 지정해 줍니다. 그리고 그다음 View는 flex을 지정해 줍니다. 이렇게 되면 사진부분은 width을 100이 되고 나머지 주황색 박스는 남은 width을 전부 가지게 되겠지요? 밑에를 보면 똑같이 가로 정렬을 위해 flexDirection을 row 해줍니다. 그리고 그 밑의 뷰는 1개의 버튼이 되겠지요. 버튼의 크기는 전체 크기의 1/3이니 flex:1 씩 모든 View에 주도록 합시다.
이제 조금 값을 넣어 보도록 하죠.
<View style={styles.user}>
        <View style={{height: 150, flexDirection: 'row', borderWidth: 1}}>
          <View style={{width: 100}}>
            <View style={{width: 100, height: 100}} ></View>
          </View>
          <View style={{flex: 1}}>
            <Text>닉네임</Text>
            <Text>이름 / ID</Text>
            <Text>학교이름</Text>
          </View>
        </View>
        <View style={{height: 50, flexDirection: 'row', borderWidth: 1}}>
          <View style={{flex: 1, flexDirection: 'row', borderWidth: 1}}>
            <View style={{width: 30, height: 30}}>
            </View>
            <Text>내가 쓴 글</Text>
          </View>
          <View style={{flex: 1, flexDirection: 'row', borderWidth: 1}}>
            <View style={{width: 30, height: 30}}>
            </View>
            <Text>내가 쓴 글</Text>
          </View>
          <View style={{flex: 1, flexDirection: 'row', borderWidth: 1}}>
            <View style={{width: 30, height: 30}}>
            </View>
            <Text>내가 쓴 글</Text>
          </View>
        </View>
</View>
현재 각 View들의 크기를 알기 위해서 borderWidth을 넣었습니다. 결과는

이렇게 됩니다. 아직 Image을 만들지도 않았고 Text들도 정렬하지 않았기 때문이지요.
      <View style={styles.user}>
        <View style={{height: 150, flexDirection: 'row', alignItems: 'center'}}>
          <View style={{width: 100}}>
            <View style={{width: 100, height: 100, backgroundColor: 'gray'}} ></View>
          </View>
          <View style={{flex: 1}}>
            <Text>닉네임</Text>
            <Text>이름 / ID</Text>
            <Text>학교이름</Text>
          </View>
        </View>
        <View style={{height: 50, flexDirection: 'row', alignItems: 'center'}}>
          <View style={{flex: 1, height: 50, flexDirection: 'row', borderWidth: 1, alignItems: 'center', justifyContent: 'center'}}>
            <View style={{width: 30, height: 30, backgroundColor: 'gray'}}>
            </View>
            <Text>내가 쓴 글</Text>
          </View>
          <View style={{flex: 1, height: 50, flexDirection: 'row', borderWidth: 1, alignItems: 'center', justifyContent: 'center'}}>
            <View style={{width: 30, height: 30, backgroundColor: 'gray'}}>
            </View>
            <Text>댓글 단 글</Text>
          </View>
          <View style={{flex: 1, height: 50, flexDirection: 'row', borderWidth: 1, alignItems: 'center', justifyContent: 'center'}}>
            <View style={{width: 30, height: 30, backgroundColor: 'gray'}}>
            </View>
            <Text>스크랩</Text>
          </View>
        </View>
      </View>

꽤 그럴듯 하게 바뀌었습니다. 이제 좀 더 다듬어 보기로 할까요?
사진을 넣고, margin을 넣고, 컬러를 바꾸고, 폰트 크기를 바꿉니다
그러면

이미지는
![]()


을 사용했습니다.
img 라는 folder만들고 그 안에 이미지를 넣으세요.
그럴듯 하게 됩니다. 이미지를 화질이 안좋은건... 음 이건 나중에 디자이너에게 부탁하도록 하죠(이게 다 svg를 지원안하는 RN때문입니다...) (나중에 custom Library 등을 통해서 svg을 지원하고, 크기를 자동으로 맞춰줄 수 있지만 지금은 간단하게 UI만 만드니 나중에 하도록 하죠)
      <View style={styles.user}>
        <View style={{height: 150, flexDirection: 'row', alignItems: 'center'}}>
          <View style={{width: 100}}>
            <View style={{width: 100, height: 100}} >
              <Image source={require('./img/avatar.png')} style={{width: 100, height: 100}}/>
            </View>
          </View>
          <View style={{flex: 1, marginLeft: 10}}>
            <Text style={{fontSize: 30}}>닉네임</Text>
            <Text style={{color: 'gray', fontSize: 15}}>이름 / ID</Text>
            <Text style={{color: 'gray', fontSize: 15}}>학교이름</Text>
          </View>
        </View>
        <View style={{height: 50, flexDirection: 'row', alignItems: 'center'}}>
          <View style={{flex: 1, height: 50, flexDirection: 'row', borderWidth: 0.5, borderLeftWidth: 0, borderRightWidth: 0, borderColor: 'gray', alignItems: 'center', justifyContent: 'center'}}>
            <Image source={require('./img/list.png')} style={{width: 30, height: 25}}/>
            <Text style={{marginLeft: 5}}>내가 쓴 글</Text>
          </View>
          <View style={{flex: 1, height: 50, flexDirection: 'row', borderWidth: 0.5, borderColor: 'gray', alignItems: 'center', justifyContent: 'center'}}>
            <Image source={require('./img/chat.png')} style={{width: 30, height: 25}}/>
            <Text style={{marginLeft: 5}}>댓글 단 글</Text>
          </View>
          <View style={{flex: 1, height: 50, flexDirection: 'row', borderWidth: 0.5, borderLeftWidth: 0, borderRightWidth: 0, borderColor: 'gray', alignItems: 'center', justifyContent: 'center'}}>
            <Image source={require('./img/star.png')} style={{width: 30, height: 30}}/>
            <Text style={{marginLeft: 5}}>스크랩</Text>
          </View>
        </View>
      </View>
코드에서 style부분이 너무너무 더럽고 복잡합니다. 하지만 이걸 밑의 style부분에 다 넣으면 뭔가 더 복잡해 질거 같군요. 어떡하면 좋을까요?
userComponent을 빼보도록 할까요?
같은 폴더에 user.js을 만들도록 합시다.
그 다음
import React, { Component } from 'react';
import {
  AppRegistry,
  StyleSheet,
  Text,
  View,
  Image
} from 'react-native';

export default class User extends Component {
  render() {
    return(
      <View style={styles.user}>
        <View style={{height: 150, flexDirection: 'row', alignItems: 'center'}}>
          <View style={{width: 100}}>
            <View style={{width: 100, height: 100}} >
              <Image source={require('./img/avatar.png')} style={{width: 100, height: 100}}/>
            </View>
          </View>
          <View style={{flex: 1, marginLeft: 10}}>
            <Text style={{fontSize: 30}}>닉네임</Text>
            <Text style={{color: 'gray', fontSize: 15}}>이름 / ID</Text>
            <Text style={{color: 'gray', fontSize: 15}}>학교이름</Text>
          </View>
        </View>
        <View style={{height: 50, flexDirection: 'row', alignItems: 'center'}}>
          <View style={{flex: 1, height: 50, flexDirection: 'row', borderWidth: 0.5, borderLeftWidth: 0, borderRightWidth: 0, borderColor: 'gray', alignItems: 'center', justifyContent: 'center'}}>
            <Image source={require('./img/list.png')} style={{width: 30, height: 25}}/>
            <Text style={{marginLeft: 5}}>내가 쓴 글</Text>
          </View>
          <View style={{flex: 1, height: 50, flexDirection: 'row', borderWidth: 0.5, borderColor: 'gray', alignItems: 'center', justifyContent: 'center'}}>
            <Image source={require('./img/chat.png')} style={{width: 30, height: 25}}/>
            <Text style={{marginLeft: 5}}>댓글 단 글</Text>
          </View>
          <View style={{flex: 1, height: 50, flexDirection: 'row', borderWidth: 0.5, borderLeftWidth: 0, borderRightWidth: 0, borderColor: 'gray', alignItems: 'center', justifyContent: 'center'}}>
            <Image source={require('./img/star.png')} style={{width: 30, height: 30}}/>
            <Text style={{marginLeft: 5}}>스크랩</Text>
          </View>
        </View>
      </View>
    )
  }
}
const styles = StyleSheet.create({
  user: {
    height: 200,
    backgroundColor: 'white',
  },
})
이렇게 만들어 주시고 index.ios.js 에 있는 user클래스를 지웁시다.
이제 위의 코드를 살펴 봅시다.
그냥 단순히 User을 빼온거 같은데 class 앞에 export default 라는 것이 붙습니다?
export 라는 것은 말 그대로 이 class을 뺀다는 것입니다. export 을 한 class는 다른 파일에서 불러오는 것을 가능하게 합니다.
음 좀 이해가 안되시나요?
이 User을 다른 파일에서 사용하기 위해서는
이 user을 import 해야 합니다.
index.ios.js
import User from './user.js'
이렇게 말이죠. 이걸 index.ios.js에 추가시켜 줍시다. 그다음 실행을 하면 마치 아까와 아무 변화가 없습니다.
즉 index.ios.js에서는 User을 정의 하지 않았지만 user.js 에서 User을 불러옴으로써 User을 사용할수 있게 해주는 것입니다.
마찬가지로 navBar도 한번 빼 보도록 할까요?
navBar.js
import React, { Component } from 'react';
import {
  StyleSheet,
  Text,
  View,
} from 'react-native';


export default class NavBar extends Component {
  render() {
    return(
      <View style={styles.navBar}>
        <Text style={styles.navBarText}>
          더 보기
        </Text>
      </View>
    )

  }
}

const styles = StyleSheet.create({
  navBar: {
    height: 60,
    backgroundColor: '#FF6E40',
    justifyContent: 'center',
    alignItems: 'center',
  },
  navBarText: {
    fontSize: 20,
    color: 'white',
  },

});
import User from './user.js'
을 index.ios.js을 추가. 그뒤에 index.ios.js에 있는 User클래스를 지워주세요.(안지워 주면 클래스 선언을 2번 하기때문에 에러가 납니다)
실행하면 아까와 같은 화면이 나오게 됩니다.
마찬가지로 buttonGroup 과 tap도 빼보도록 하죠.
뭔가 파일이 여기저기 흩어져 있군요. components라는 folder을 만들고 한곳에 넣읍시다.
gitbookTest
 |- components
   |- buttonGroup.js
   |- navBar.js
   |- tabs.js
   |- user.js
 |- img
   |- avatar.png
   |- chat.png
   |- list.png
   |- star.png
|- index.ios.js
이러한 파일 구조가 되는군요.
import NavBar from './components/navBar'
로 바꾸어 주고, 다른 경로들도 알맞게 바꾸어 줍니다.
물론 user.js안에 있는 Image의 경로들도 바꾸어 주세요 ./../img/~~가 되겠지요?
이제 그 다음 편에는 buttonGroup을 만들도록 합시다.